- June 1, 2023
- by Toby
- Calibration
Pressure gauge calibration is the process of comparing a pressure gauge’s accuracy to a recognized standard. This is accomplished by comparing the gauge’s output to that of a reference gauge or by delivering a known pressure to the gauge and measuring the output. Calibration may be done on a number of pressure gauges, including analog and digital gauges, and is a vital step in ensuring that the gauge provides accurate and trustworthy readings. Calibration of a pressure gauge often entails changing the gauge to ensure compliance with industry standards and regulations. To discover more about how pressure gauges operate, see our page on how they function.
How to calibrate a pressure gauge
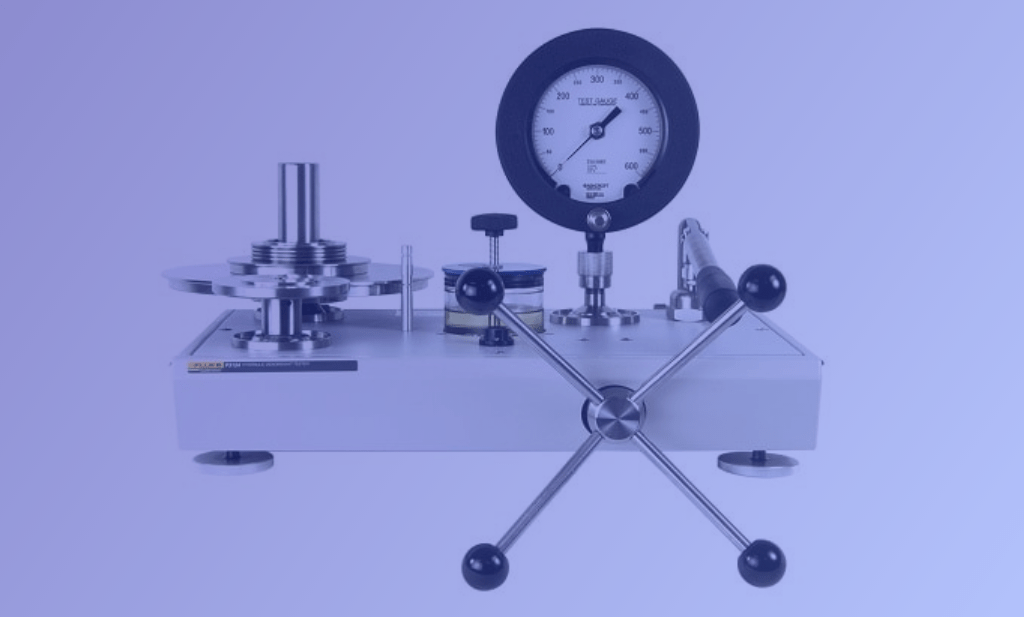
Pressure calibration equipment such as a deadweight tester, standard pneumatic calibrator, or any other pressure gauge calibrator with an accurate reading is used to calibrate a pressure gauge. The main ideas and processes to calibrate a pressure gauge are quite same regardless of the tool, whether it’s mechanical or digital gauge calibration.
- Using the proper adapter or fitting, connect the hand pump calibrator to the pressure gauge to be calibrated.
- Set the hand pump calibrator to the required pressure.
- Pump the hand pump calibrator gradually until the appropriate pressure is obtained.
- Examine the pressure gauge and make sure it reads the same as the manual pump calibrator.
- If the gauge does not read the right pressure, follow the manufacturer’s instructions.
- Repeat the procedure at each pressure point to check that the gauge is accurate throughout its range.
- Record the calibration results and make any required modifications.
When the calibration is finished, remove the hand pump calibrator and store it properly.
Factors to consider for pressure gauge calibration
A precise pressure system is used for pressure calibration. The pressure reading on calibrated pressure gauges is logged and compared to the uncalibrated gauge to determine the margin of error. However, several factors can influence the calibration process and should be considered:
- Accuracy class:
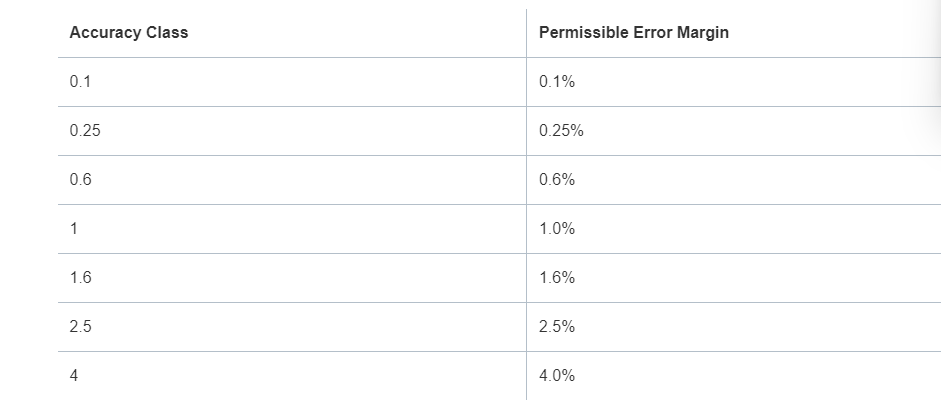
The accuracy class is the pressure gauge’s maximum margin of error for the maximum scale reading. The accuracy class will assist operators in determining the permissible margin of error during calibration. The table below will assist you in determining the allowable error margin based on the accuracy class of the pressure gauge.

Image Source: Tameson
Call us to discuss your calibration, test or repair needs at:
713.944.3139.
- Pressure media:
When calibrating a pressure gauge, it is best to utilize the same media that the pressure gauge is attached to. If this is not feasible, calibration with air/gas is appropriate for low-pressure gauges, whereas liquids are safer for high-pressure gauges.
- Height difference:
Because of the hydrostatic pressure of the medium, the difference in height between the pressure gauge calibration equipment and the pressure gauge might produce an inaccuracy during calibration. This is more common in liquid medium than in gas media. The size of the inaccuracy varies with the density of the liquid and the variation in height. If the calibration equipment and gauge cannot be placed at the same height, the effect of the height difference should be considered during calibration. A 2.5 cm (1 in) height variation allows for a pressure measurement error of around 0.02 bar (0.3 psi).
- Contamination:
Contamination such as dirt, moisture, or oil can harm both the pressure gauge and the calibration equipment. As a result, it is critical to ensure that the media and equipment are free of contamination and do not interfere with the operation.
- Leak testing:
A leak test is required prior to calibration because any leakage in the pipe system might cause calibration problems. Pressurizing the system, allowing the pressure gauge to settle, and monitoring the pressure are all ways to do a leak test. Any decrease in pressure might indicate a leak. During calibration, the pressure loss must be kept to a minimum.
- Adiabatic effect:
When the pressure quickly varies, the adiabatic effect can impair pressure gauge calibration accuracy. As the pressure fluctuates quickly, the temperature of the fluid inside the gauge changes, affecting the density of the fluid and hence the pressure. This might result in mistakes in the gauge’s reading, leading to erroneous calibration findings.
It is advised to utilize a pressure gauge with a high-frequency response to reduce the impacts of the adiabatic effect during calibration. Such gauges have a quicker reaction time and can correctly monitor rapid pressure changes.
- Pressurizing or exercising the gauge:
Friction is caused by movement in mechanical pressure gauges. Exercising or pressurizing the system prior to calibration might help to minimize friction. This is accomplished by applying the nominal pressure, holding it for a minute, and then releasing it. Repeat two or three times more.
- Mounting position:
Because the pressure gauge is mechanical, the location of the gauge might impact the pressure measurement in the system. As a result, it is advised that the gauge be calibrated in the same place that it will be used in the real pressure measurement process. To guarantee proper installation, see the manufacturer’s instructions.
- Readability:
During calibration, adjust the input pressure so that the indicator needle always lands on a major scale mark instead of in between them. This makes the calibration process more convenient.
- Hysteresis:
The discrepancy in pressure readings when a gauge is subjected to increased and lowering pressure is referred to as hysteresis in pressure gauge calibration. In other words, it is the difference in pressure readings between when a gauge is calibrated while rising pressure and when it is calibrated while reducing pressure. Mechanical wear, temperature variations, and gauge design can all contribute to this variance. When calibrating pressure gauges, it is critical to account for hysteresis to guarantee accurate results.
- Repeatability:
Repeatability, or the ability to generate the same reading for the same input, is one of the characteristics of an accurate pressure gauge. Calibration is required if the gauge produces different results each time. It is advised that the gauge be pressurized for three cycles before calibration.
- Environmental condition:
The gauge reading may change depending on the temperature to which the procedure is subjected. Because the pressure gauge is typically calibrated at normal room temperature, changes in temperature can affect the accuracy of the pressure measurement. When calibrating, it is therefore advised to record the temperature and humidity.
- Metrological traceability:
Metrological traceability is critical in pressure gauge calibration because it assures that the gauge’s pressure measurements are accurate and compatible with the international system of units (SI). To establish metrological traceability in pressure gauge calibration, the gauge must be calibrated against a SI-traceable reference. The gauge is frequently compared to a recognized standard, such as a deadweight tester or a main pressure standard.
- Calibration uncertainty:
Calibration uncertainty might suggest a probable discrepancy in the calibrated value. Environmental factors, reference equipment, or operators taking the reading can all contribute to this uncertainty. It is critical to understand calibration uncertainty and separate mistake from uncertainty. Calculators for TUR (Test Uncertainty Ratio) or TAR (Test Accuracy Ratio) are one approach to be aware of linked uncertainty, albeit not all connected uncertainties are addressed. As a result, calculating the overall uncertainty of the calibration is advised to determine how successful the calibration is.
- Calibration intervals:
Pressure gauges must be calibrated on a regular basis to ensure the accuracy of the measurement. However, calibration requirements may vary based on the gauge’s purpose and design. Although there is no definitive answer, a typical guideline is once a year. However, it is also vital to verify for the manufacturer’s advise on the calibration time. Pressure gauges used in difficult working circumstances may necessitate more regular calibration.
In-house vs outsourcing calibration
Pressure gauge calibration can be done in-house or outsourced for maximum efficiency. The optimum option may be determined by the resources that a corporation is prepared to invest.
In-house calibration necessitates an investment in calibration equipment, specialists, training, and the establishment of a controlled environment. Even with these measures, it is difficult to establish verification of calibration accuracy. This is due to the fact that gauges and calibration equipment must continuously fulfill all of the stringent national and international criteria in order to validate the calibration process, which can be difficult for small in-house operations. These are some examples:
- ISO/IEC 17025: This standard enables labs to demonstrate that they operate effectively and deliver legitimate findings, encouraging trust in their work both locally and globally.
- ASME B40 – 2013: This American Association of Mechanical Engineers standard includes specifications for pressure gauges, components, diaphragm seals, digital pressure gauges, and more. The handbook covers vocabulary and definitions, dimensions, safety, construction, and installation difficulties, testing and calibration processes, and general suggestions.
Call us to discuss your calibration, test or repair needs at:
713.944.3139.


